Setting up the environment
In this section we will see how to setup the environment and the used tools for API testing.
Prerequisites
Add Reqnroll's extension for Visual Studio (and Visual Studio code)
- Go to Extensions -> Manage Extensions
- Search for Reqnroll for Visual Studio search for Reqnroll for Visual Studio 2022
- Download and install it
- Restart your IDE
Creating the client helper project step by step
In your cluster repository, create a new project called {cluster}ApiHelper in the following location: {cluster} / projects / ApiTests
Create a new file called {cluster}Client.constructor.cs in the same folder.
NSwag Studio
Introduction
NSwag Studio is a powerful, graphical user interface (GUI) tool designed to work with the NSwag toolchain, which is used for generating client code, API documentation, and various assets related to web API development. NSwag (short for "Not Swagger").
Installation
Go to NSwag Studio and download the latest version.
Using NSwag Studio
Make sure your Neos Cluster is running. On the manager, go to Documentation API. You should see all your API endpoints and their documentation generated by OpenAPI.
In your NSwag Studio application
You have two ways to generate your API client:
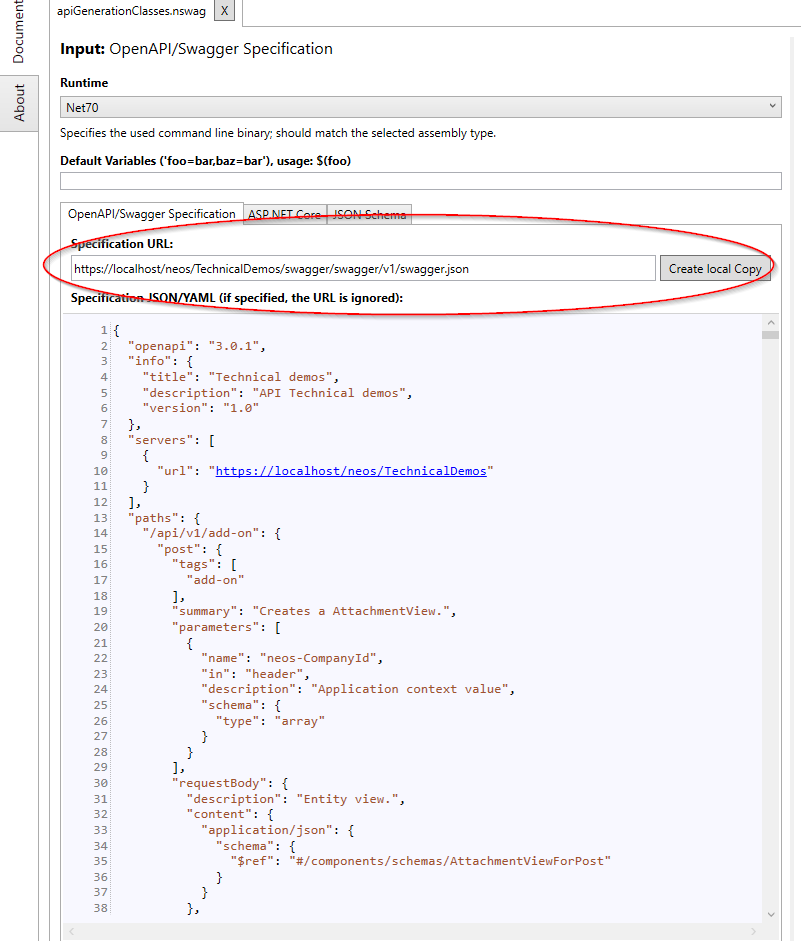
By using the OpenAPI Specification URL
You can find the URL in your Swagger's documentation page right under your cluster's name.
Then click on "Create Local Copy" to generate the JSON
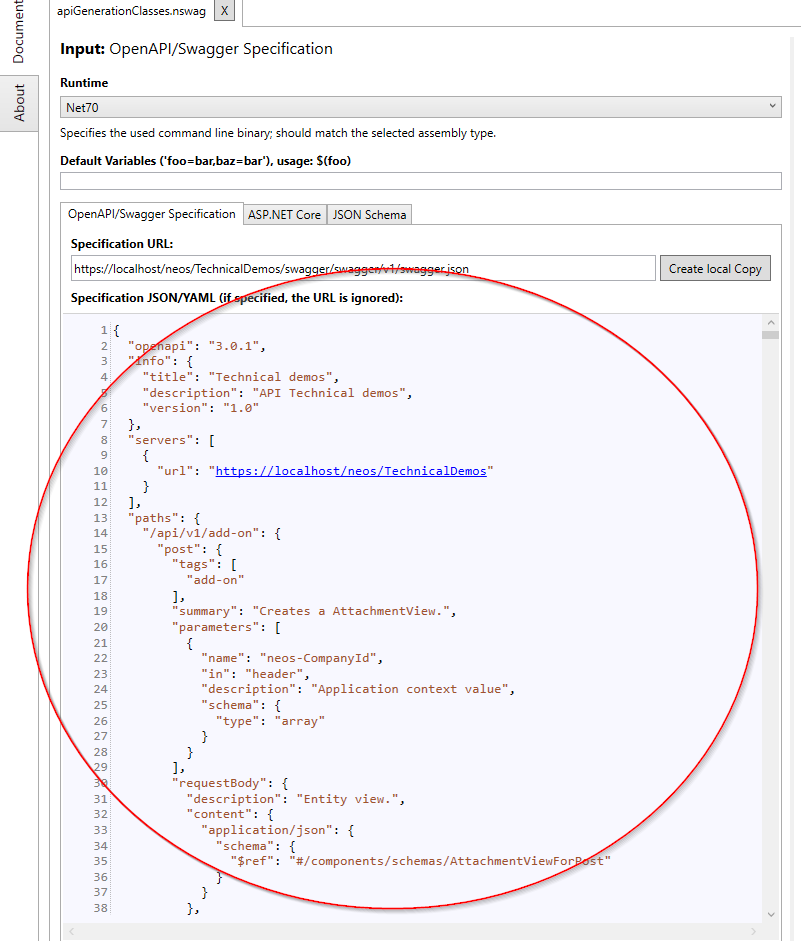
By using the JSON specification Swagger Specification JSON
The JSON specification is available in your Swagger's documentation page when you click on the URL under your cluster's name. Then you can copy the JSON specification and paste it in the Specification JSON/YAML field in NSwag Studio
Setting up the output
Check the output type "CSharp Client". Then go to settings. In the settings, you have several options to configure your output.
You can find the complete settings used and recommended by the Neos Team here
Important : Output file path: Is the path where your generated client will be saved. Specify the path to your {cluster}ApiHelper project.
Generate your client
Click on Generate Outputs and wait for the generation to finish.
Generate the file
You can generate the file by clicking on the Generate Files button.
You can find the generated file in the path you specified in the settings.
What to do with this file ?
(File generated with the Json of a Cluster in 1.19.0)
First of all, you will find the Client class, which is the main class of your generated client.
 public partial class TechnicalDemosClient
    {
    #pragma warning disable 8618 // Set by constructor via BaseUrl property
        private string _baseUrl;
    #pragma warning restore 8618 // Set by constructor via BaseUrl property
        private System.Net.Http.HttpClient _httpClient;
        private static System.Lazy<Newtonsoft.Json.JsonSerializerSettings> _settings = new System.Lazy<Newtonsoft.Json.JsonSerializerSettings>(CreateSerializerSettings, true);

        public TechnicalDemosClient(System.Net.Http.HttpClient httpClient)
        {
            BaseUrl = "https://localhost/neos/TechnicalDemos";
            _httpClient = httpClient;
        }

        private static Newtonsoft.Json.JsonSerializerSettings CreateSerializerSettings()
        {
            var settings = new Newtonsoft.Json.JsonSerializerSettings();
            UpdateJsonSerializerSettings(settings);
            return settings;
        }

        public string BaseUrl
        {
            get { return _baseUrl; }
            set
            {
                _baseUrl = value;
                if (!string.IsNullOrEmpty(_baseUrl) && !_baseUrl.EndsWith("/"))
                    _baseUrl += '/';
            }
        }
Then you will find the entity view models of your cluster.
Let's take a simple example with the Product entity view model.
Each entity view have three classes, one for each API call (GET, POST, PUT).
    [System.CodeDom.Compiler.GeneratedCode("NJsonSchema", "14.0.1.0 (NJsonSchema v11.0.0.0 (Newtonsoft.Json v13.0.0.0))")]
    public partial class ProductViewGetModel
    {
        [Newtonsoft.Json.JsonProperty("id", Required = Newtonsoft.Json.Required.Default, NullValueHandling = Newtonsoft.Json.NullValueHandling.Ignore)]
        public int? Id { get; set; } = default!;

        [Newtonsoft.Json.JsonProperty("name", Required = Newtonsoft.Json.Required.Default, NullValueHandling = Newtonsoft.Json.NullValueHandling.Ignore)]
        public string? Name { get; set; } = default!;

        [Newtonsoft.Json.JsonProperty("rowVersion", Required = Newtonsoft.Json.Required.Default, NullValueHandling = Newtonsoft.Json.NullValueHandling.Ignore)]
        public byte[]? RowVersion { get; set; } = default!;

    }

    /// <summary>
    /// Represents Product.
    /// </summary>
    [System.CodeDom.Compiler.GeneratedCode("NJsonSchema", "14.0.1.0 (NJsonSchema v11.0.0.0 (Newtonsoft.Json v13.0.0.0))")]
    public partial class ProductViewPostModel
    {
        [Newtonsoft.Json.JsonProperty("name", Required = Newtonsoft.Json.Required.Always)]
        [System.ComponentModel.DataAnnotations.Required]
        public string Name { get; set; } = default!;

    }

    /// <summary>
    /// Represents Product.
    /// </summary>
    [System.CodeDom.Compiler.GeneratedCode("NJsonSchema", "14.0.1.0 (NJsonSchema v11.0.0.0 (Newtonsoft.Json v13.0.0.0))")]
    public partial class ProductViewPutModel
    {
        [Newtonsoft.Json.JsonProperty("id", Required = Newtonsoft.Json.Required.Always)]
        public int Id { get; set; } = default!;

        [Newtonsoft.Json.JsonProperty("name", Required = Newtonsoft.Json.Required.Always)]
        [System.ComponentModel.DataAnnotations.Required]
        public string Name { get; set; } = default!;

        [Newtonsoft.Json.JsonProperty("rowVersion", Required = Newtonsoft.Json.Required.Default, NullValueHandling = Newtonsoft.Json.NullValueHandling.Ignore)]
        public byte[]? RowVersion { get; set; } = default!;

    }
NSwag studio generates a client and this client is a partial class. A partial class is a C# feature that allows a class to be defined in multiple files. Each part of the partial class is identified with the partial keyword, and the parts are combined into a single class during compilation. This allows for splitting the definition of a class across multiple files, which can be useful for organizing and separating concerns.
It's useful as the client already have some methods, Ready to be implemented in another another partial class in another file for example.
        partial void PrepareRequest(System.Net.Http.HttpClient client, System.Net.Http.HttpRequestMessage request, string url);

        partial void PrepareRequest(System.Net.Http.HttpClient client, System.Net.Http.HttpRequestMessage request, System.Text.StringBuilder urlBuilder);

        partial void ProcessResponse(System.Net.Http.HttpClient client, System.Net.Http.HttpResponseMessage response);
Completing the constructor.cs file
The constructor file is a second part of the generated partial class. It adds what the shared test support needs, and nothing else: the HTTP client, the base address and the authentication come from automation/GroupeIsa.Neos.ApiHelpers (ClusterClientFactory, ClusterClientAuthenticator, ClusterClientEnvironment).
{ClusterName}Client.Constructor.cs
using System.Text.Json;
using System.Text.Json.Serialization;

namespace GroupeIsa.Neos.ApiHelpers.{ClusterName}
{
    public partial class {ClusterName}Client : IClusterClient
    {
        public int StatusCode { get; private set; }

        public HttpClient HttpClient => _httpClient;

        public string ClusterName => "{ClusterName}";

        public static string DefaultUserIdentifier => Environment.GetEnvironmentVariable(ClusterClientEnvironment.DefaultAccountClientIdVariable) ?? "[email protected]";

        public static Task<{ClusterName}Client> CreateAsync(ClusterClientOptions options)
        {
            return ClusterClientFactory.CreateAsync(httpClient => new {ClusterName}Client(httpClient), options);
        }

        static partial void UpdateJsonSerializerSettings(JsonSerializerOptions settings)
        {
            settings.DefaultIgnoreCondition = JsonIgnoreCondition.WhenWritingNull;
        }

        partial void ProcessResponse(HttpClient client, HttpResponseMessage response)
        {
            StatusCode = (int)response.StatusCode;
        }
    }
}
A second file lets the shared cleanup tracker recognise the exceptions of the client:
ApiException.Partial.cs
namespace GroupeIsa.Neos.ApiHelpers.{ClusterName}
{
    public partial class ApiException : IApiException
    {
    }
}
The identity of the client
There is no options class to write: a client takes the shared ClusterClientOptions. It names either a service account (ClientCredentialType, authenticated with a bearer token when its credentials are configured, as in the pipelines, and with the Neos-Automation header otherwise, as in a local run through the development proxy) or a user to impersonate (UserIdentifier). The environment variables read for the base address and the service accounts are listed in ClusterClientEnvironment.
Registering the client for the scenarios
The step classes receive the client through their constructor. A hook of the helper project creates it once per scenario and registers it in the Reqnroll container, which is why the helper project references the Reqnroll package:
Hooks/ClusterClientRegistration.cs
using GroupeIsa.Neos.ApiHelpers;
using GroupeIsa.Neos.ApiHelpers.{ClusterName};
using Reqnroll;
using Reqnroll.BoDi;

namespace {ClusterName}.ApiHelpers.Hooks
{
    [Binding]
    public sealed class ClusterClientRegistration
    {
        private readonly IObjectContainer _objectContainer;

        public ClusterClientRegistration(IObjectContainer objectContainer)
        {
            _objectContainer = objectContainer;
        }

        [BeforeScenario(Order = 0)]
        public async Task RegisterClientAsync()
        {
            {ClusterName}Client client = await {ClusterName}Client.CreateAsync(new ClusterClientOptions
            {
                ClientCredentialType = ClusterClientOptions.ClientCredentialUserType.ApiDefaultAccount,
                UserIdentifier = {ClusterName}Client.DefaultUserIdentifier,
            });
            _objectContainer.RegisterInstanceAs(client);
            _objectContainer.RegisterInstanceAs<IClusterClient>(client);
        }
    }
}
The reqnroll.json of the cluster, {cluster}/projects/ApiTests/build/reqnroll.json, lists the helper assembly, GroupeIsa.Neos.ApiTests.Support (cleanup tracker, Swagger steps, guard checking that a client was registered) and GroupeIsa.Neos.ApiTests.AllureSupport as binding assemblies. The cluster props links it into every test project.
Checking the status codes
The helper project also carries the step checking the status code of the last API call of the scenario. The code is read from the HTTP exchanges recorded for the running test, whichever client sent the request, so the step needs no client of its own. Its wording belongs to the cluster: Reqnroll rejects a step bound in two assemblies, so the shared test support cannot carry it.
StepDefinitions/StatusCodeStepDefinitions.cs
using FluentAssertions;
using GroupeIsa.Neos.ApiTests.Support.Clients;
using Reqnroll;

namespace {ClusterName}.ApiHelpers.StepDefinitions
{
    [Binding]
    public sealed class StatusCodeStepDefinitions
    {
        [Then("The API status code should be {int}")]
        public static void ThenTheApiStatusCodeShouldBe(int expectedStatusCode)
        {
            ScenarioHttp.LastStatusCode().Should().Be(expectedStatusCode, "it is the status code of the last API call of the scenario");
        }
    }
}
Creating the test project
The location of the tests should have a structure similar to the UI tests.
"{cluster} / modules / {theModuleYouWantToTest} / apiTests / {nameOfTheModule}.ApiTests"
It should give something like this :
technicaldemos/modules/Core/apiTests/Products
Creating a new solution
- Open Visual Studio
- Go to File -> New -> Project
- Search for Reqnroll and select Reqnroll Project
- Name your project and click on Create
- Select .NET 8 as target framework
- Select Xunit as unit test provider
Wiring the test project
The test project imports the ApiTests.props of its cluster, {cluster}/projects/ApiTests/build/ApiTests.props, and declares nothing else: the props carries the package versions, the reference to the helper project, the shared test support, the cluster reqnroll.json and the Allure reporting.
<Project Sdk="Microsoft.NET.Sdk">

  <Import Project="..\..\..\..\projects\ApiTests\build\ApiTests.props" />

</Project>
Your project is ready !