Neos Studio VS Code Extension
The Neos Studio extension is a Visual Studio Code extension that provides Neos Studio functionality directly within Visual Studio Code. It allows you to work with Neos Studio clusters, manage your Neos Studio environment, and perform various tasks without leaving your code editor.
Installation
To install the Neos Studio extension for Visual Studio Code, follow these steps:
Ensure you have Visual Studio Code version 1.109 or later installed on your machine. You can download it from the official website: Visual Studio Code or use winget:
# Install Visual Studio Code using winget
winget install --id=Microsoft.VisualStudioCode

# Update Visual Studio Code using winget
winget upgrade --id=Microsoft.VisualStudioCode
Note
If you have disabled UAC and installed VS Code with administrator privileges, VS Code will not be able to update itself. You can install VS Code with winget without administrator privileges by adding
--scope userto the command:winget install --id=Microsoft.VisualStudioCode --scope userIn this case, you can update VS Code using the same command, as winget will handle the update process :
winget upgrade --id=Microsoft.VisualStudioCode --scope userOpen Visual Studio Code.
Go to the Extensions view by clicking the Extensions icon in the Activity Bar on the side of the window, or by pressing
Ctrl+Shift+X.In the search bar, type "Neos Studio" and press Enter.
Find the Neos Studio extension in the search results and click the Install button.
Warning
Only a pre-release version of the extension is available at the moment. If VS Code displays an error message about the release extension not existing, you can ignore it and proceed with the installation by clicking "Install Pre-Release".
Recommended Extensions
To enhance your experience with the Neos Studio extension, we recommend installing the following extensions:
- C# — Provides support for C# development, which is essential for working with Neos Studio.
- C# Dev Kit — Offers additional tools and features for C# development, making it easier to work with Neos Studio projects.
[!TIP]
For the best experience with the Neos Studio extension, open the generated solution file (./server/[YourClusterName].sln) in Visual Studio Code. This allows you to edit the business assemblies within the same Visual Studio instance.
Quick Start
After installing the Neos Studio extension, you can start using it by following these steps:
Open a folder containing your Neos Studio cluster in Visual Studio Code.
In the Activity Bar, click the Neos Studio icon to open the Neos Studio panel.
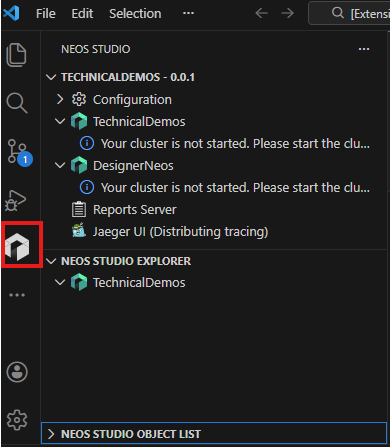
In the Neos Studio panel, you will see the initial view "Neos Studio". Here, you can view and manage your Neos Studio clusters.
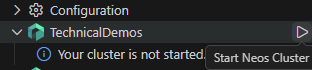
To start a cluster, click the "Start Neos Cluster" button in the cluster name node.
After the cluster is started, you can see the cluster status in the Neos Studio panel. The view "Neos Studio Explorer" will be enabled, and you can see your cluster resources in the explorer view.
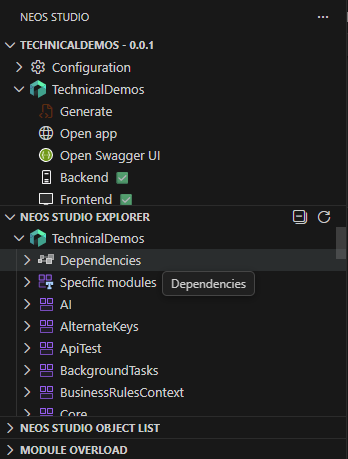
You can open an entity by expanding the module containing the entity and clicking the entity name. The entity will open in a new editor tab. You can edit the entity in the editor and save it to update the entity in the cluster.